tiangolo/uwsgi-nginx를 사용해서 docker에서 ngix와 flask를 사용하여 front와 back을 구동할 수 있습니다.
우선 front를 위해서는 nginx에 nginx.conf를 사용합니다.
저는 app/static 이라는 폴더를 만들어서 index.html을 추가했습니다.
구조는 다음과 같습니다.
~+ docker
├── app
│ ├── static
│ │ └── index.html
│ ├── main.py
│ ├── uwsgi.ini
│ └── index.js
├── docker-compose.yml
├── Dockerfile
├── endtrypoint.sh
├── requirements.txt
└── uwsgi.ini
docker-compose.yml은 다음과 같습니다.
version: "3.8"
services:
  sample-server:
    build:
      context: .
      dockerfile: ./Dockerfile
    container_name: sample-server
    volumes:
      - ./app/:/app
    ports:
      - "80:80"
      - "8080:8080"
    restart: always
Dockerfile은 다음과 같습니다.
FROM tiangolo/uwsgi-nginx

MAINTAINER Sebastian Ramirez <tiangolo@gmail.com>

RUN set -x \
    && apt-get update \
    # command top
    && apt-get install -y procps \
    # crontab
    && apt-get install -y cron \
    # for uwsgi
    && apt-get install --no-install-recommends --no-install-suggests -y build-essential python-dev vim \
    # supervisord
    && apt-get install -y supervisor \
    # clear
    && apt-get purge -y --auto-remove && rm -rf /var/lib/api/lists/*

COPY requirements.txt /tmp/
RUN pip3 install --upgrade pip
RUN pip3 install -r /tmp/requirements.txt

# Add app configuration to Nginx
COPY nginx.conf /etc/nginx/conf.d/
COPY uwsgi.ini /etc/uwsgi/

# Copy sample app
#COPY .. /app/

# 시간대 맞추기
RUN ln -sf /usr/share/zoneinfo/Asia/Seoul /etc/localtime

# Move the base entrypoint to reuse it
RUN mv /entrypoint.sh /uwsgi-nginx-entrypoint.sh

# Copy the entrypoint that will generate Nginx additional configs
COPY entrypoint.sh /entrypoint.sh
RUN chmod +x /entrypoint.sh
ENTRYPOINT ["/entrypoint.sh"]

# Run the start script provided by the parent image tiangolo/uwsgi-nginx which in turn will start Nginx and uWSGI
CMD ["/start.sh"]
nginx.conf를 /etc/nginx/conf.d에 복사하기 위해서 entrypoint.sh를 별도로 사용하였습니다.
원래의 entrypoint.sh에서 /etc/nginx/conf.d/nginx.conf를 생성합니다.
#!/usr/bin/env sh
set -e

# Get the maximum upload file size for Nginx, default to 0: unlimited
USE_NGINX_MAX_UPLOAD=${NGINX_MAX_UPLOAD:-0}

# Get the number of workers for Nginx, default to 1
USE_NGINX_WORKER_PROCESSES=${NGINX_WORKER_PROCESSES:-1}

# Set the max number of connections per worker for Nginx, if requested
# Cannot exceed worker_rlimit_nofile, see NGINX_WORKER_OPEN_FILES below
NGINX_WORKER_CONNECTIONS=${NGINX_WORKER_CONNECTIONS:-1024}

# Get the listen port for Nginx, default to 80
USE_LISTEN_PORT=${LISTEN_PORT:-80}

if [ -f /app/nginx.conf ]; then
    cp /app/nginx.conf /etc/nginx/nginx.conf
else
    content='user  nginx;\n'
    # Set the number of worker processes in Nginx
    content=$content"worker_processes ${USE_NGINX_WORKER_PROCESSES};\n"
    content=$content'error_log  /var/log/nginx/error.log warn;\n'
    content=$content'pid        /var/run/nginx.pid;\n'
    content=$content'events {\n'
    content=$content"    worker_connections ${NGINX_WORKER_CONNECTIONS};\n"
    content=$content'}\n'
    content=$content'http {\n'
    content=$content'    include       /etc/nginx/mime.types;\n'
    content=$content'    default_type  application/octet-stream;\n'
    content=$content'    log_format  main  '"'\$remote_addr - \$remote_user [\$time_local] \"\$request\" '\n"
    content=$content'                      '"'\$status \$body_bytes_sent \"\$http_referer\" '\n"
    content=$content'                      '"'\"\$http_user_agent\" \"\$http_x_forwarded_for\"';\n"
    content=$content'    access_log  /var/log/nginx/access.log  main;\n'
    content=$content'    sendfile        on;\n'
    content=$content'    keepalive_timeout  65;\n'
    content=$content'    include /etc/nginx/conf.d/*.conf;\n'
    content=$content'}\n'
    content=$content'daemon off;\n'
    # Set the max number of open file descriptors for Nginx workers, if requested
    if [ -n "${NGINX_WORKER_OPEN_FILES}" ] ; then
        content=$content"worker_rlimit_nofile ${NGINX_WORKER_OPEN_FILES};\n"
    fi
    # Save generated /etc/nginx/nginx.conf
    printf "$content" > /etc/nginx/nginx.conf

    content_server='server {\n'
    content_server=$content_server"    listen ${USE_LISTEN_PORT};\n"
    content_server=$content_server'    location / {\n'
    content_server=$content_server'        include uwsgi_params;\n'
    content_server=$content_server'        uwsgi_pass unix:///tmp/uwsgi.sock;\n'
    content_server=$content_server'    }\n'
    content_server=$content_server'}\n'
    # Save generated server /etc/nginx/conf.d/nginx.conf
    #printf "$content_server" > /etc/nginx/conf.d/nginx.conf

    # Generate Nginx config for maximum upload file size
    printf "client_max_body_size $USE_NGINX_MAX_UPLOAD;\n" > /etc/nginx/conf.d/upload.conf

    # Remove default Nginx config from Alpine
    printf "" > /etc/nginx/conf.d/default.conf
fi

# For Alpine:
# Explicitly add installed Python packages and uWSGI Python packages to PYTHONPATH
# Otherwise uWSGI can't import Flask
if [ -n "$ALPINEPYTHON" ] ; then
    export PYTHONPATH=$PYTHONPATH:/usr/local/lib/$ALPINEPYTHON/site-packages:/usr/lib/$ALPINEPYTHON/site-packages
fi
exec "$@"
nginx.conf 입니다.
server {
    location / {
        alias /app/static/;
    }

    location ~ ^/(hello) {
        try_files $uri @app;
    }

    location @app {
        include uwsgi_params;
        uwsgi_pass unix:///tmp/uwsgi.sock;
    }

    location ~ /index.html {
        root /app/static/;
        add_header 'Cache-Control' 'no-store';
    }
}
flask를 동작하기 위한 requirements.txt 입니다.
Flask
uwsgi.ini 입니다. (/etc/uwsgi.ini로 복사 됩니다.)
[uwsgi]
socket = /tmp/uwsgi.sock
chown-socket = nginx:nginx
chmod-socket = 664
processes = 2
cheaper = 1
app폴더는 -v로 도커에 마운트 되는 폴더입니다.
flask로 실행되는 main.py 입니다.
import sys
print (sys.path)

import traceback

from flask import Flask
from flask import request
from flask import Response

app = Flask(__name__)

DEBUG_ENABLE = True

@app.route('/hello', methods=['GET', 'POST', 'OPTIONS'])
def handler_test():
    try:
        res = ''
        res += 'request.path = {0}<br>\n'.format(request.path)
        res += 'request.args = {0}<br>\n'.format(request.args) # GET DATA
        res += 'request.data = {0}<br>\n'.format(request.data)
        res += 'request.form = {0}<br>\n'.format(request.form) # POST DATA
        res += 'request.method = {0}<br>\n'.format(request.method)
        res += 'request.headers = {0}<br>\n'.format(str(request.headers))

        res += "<br><br>Hello World from Flask using Python & Docker"
        return res, 200
    except Exception as e:
        #print(traceback.format_exc())
        #traceback.print_exc()
        #result['data'] = traceback.format_exc()
        #print(result['data'])
        return traceback.format_exc()

if __name__ == "__main__":
    app.run(host='0.0.0.0', port=8080, debug=DEBUG_ENABLE)
flask app을 실행하기 위한 uwsgi.ini 입니다. (/etc/uwsgi.ini 와는 내용이 다릅니다. 이 화일이 없으면 도커가 실행 되다 중지됩니다.)
[uwsgi]
module = main
callable = app
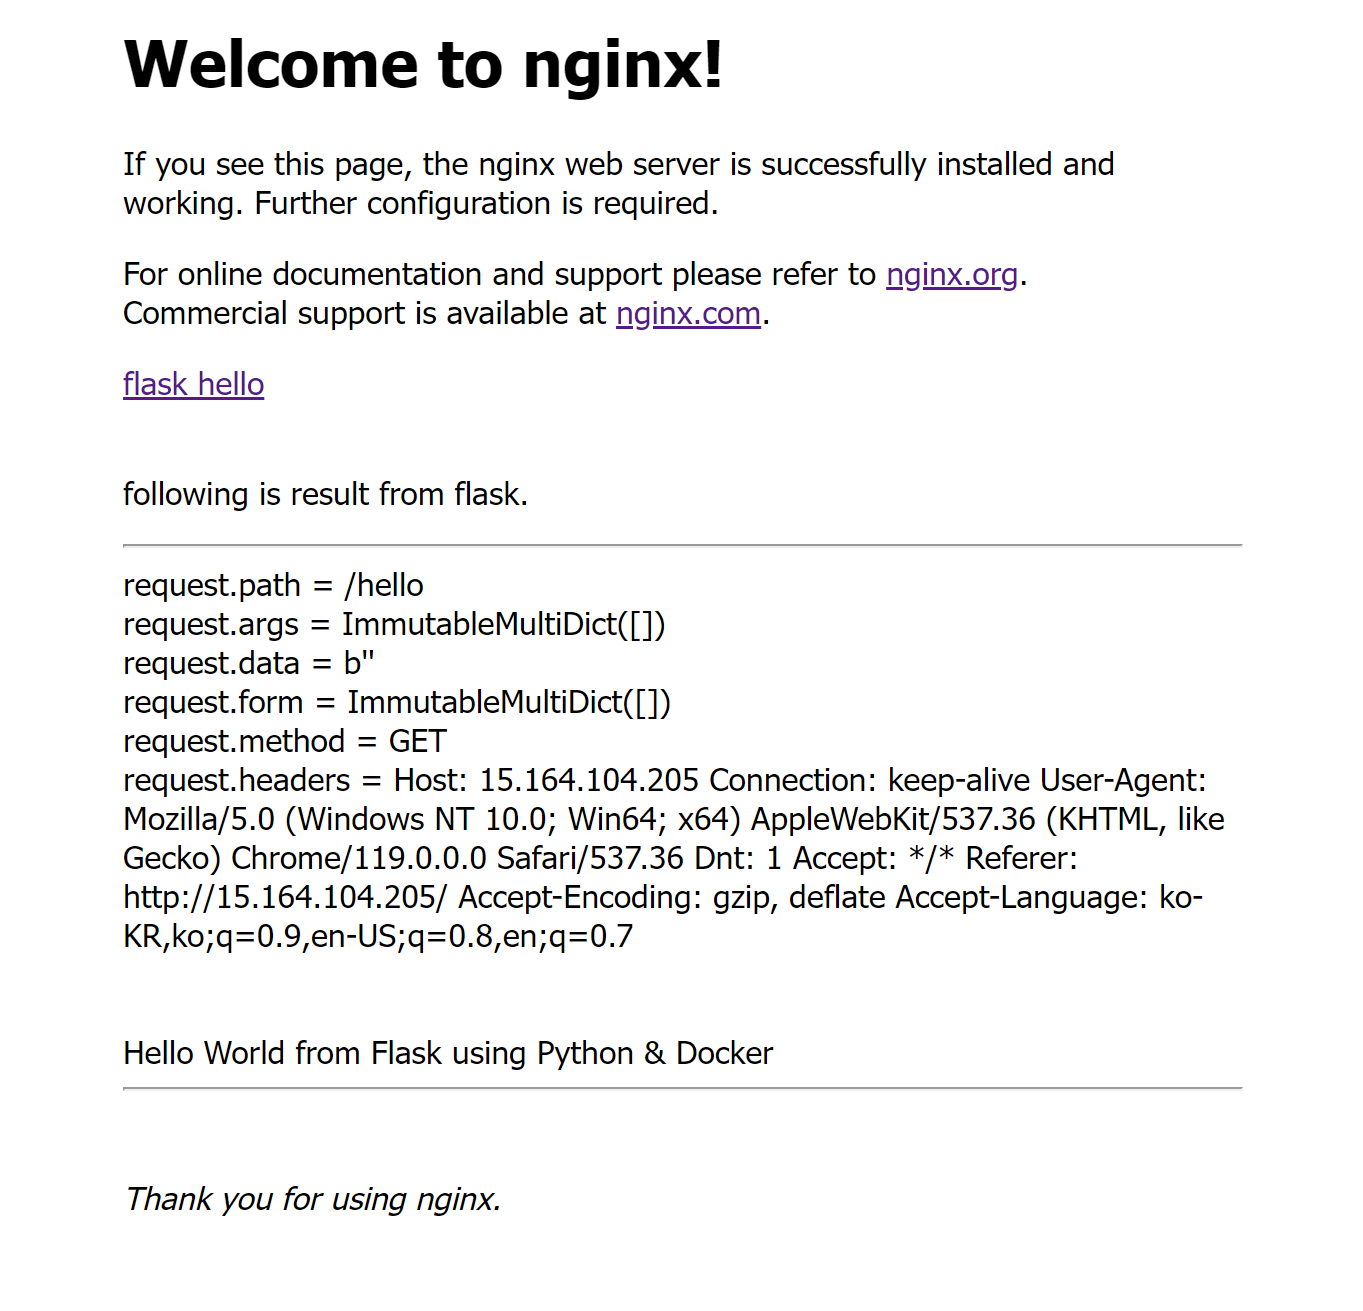
nginx로 서비스할 초기 화면입니다.
app/static/index.html 입니다.
<!DOCTYPE html>
 <html>
 <head>
 <title>Welcome to nginx!</title>
 <style>
     body {
         width: 35em;
         margin: 0 auto;
         font-family: Tahoma, Verdana, Arial, sans-serif;
     }
 </style>
 </head>
 <body>
 <h1>Welcome to nginx!</h1>
 <p>If you see this page, the nginx web server is successfully installed and
 working. Further configuration is required.</p>

 <p>For online documentation and support please refer to
 <a href="http://nginx.org/">nginx.org</a>.<br/>
 Commercial support is available at
 <a href="http://nginx.com/">nginx.com</a>.</p>

 <a href="/hello"> flask hello </a>

 <p>
 <br>
 following is result from flask.<br>
 <hr>
 <article>
 </article>
 <hr>
 <br>
 </p>
 <script>
            fetch('/hello').then(function(response){
                response.text().then(function(text){
                    document.querySelector('article').innerHTML=text;
                })
            })
 </script>

 <p><em>Thank you for using nginx.</em></p>
 </body>
 </html>
html 중간에 <a href="/hello"> flask hello </a>가 flask를 실행하는 겁니다.
~/docker 폴더에서 docker-compose -p sample up으로 실행하면 됩니다.
background로 실행하려면 docker-compose -p sample up -d로 실행하면 됩니다.
전체 화일도 같이 첨부합니다.
docker를 실행하시고 웹으로 서버를 들어가면 확인 하실 수 있습니다.
2023-11-15 추가:
github에도 올려 놓았습니다.
https://github.com/bagng/tiangolo-uwsgi-nginx.git
GitHub - bagng/tiangolo-uwsgi-nginx
Contribute to bagng/tiangolo-uwsgi-nginx development by creating an account on GitHub.
github.com
'리눅스' 카테고리의 다른 글
| ubuntu selenium chrome-driver 오류 (0) | 2024.07.27 |
|---|---|
| tiangolo/uwsgi-nginx 사용해서 웹과 flask 사용하기(pyinstaller) (0) | 2023.11.29 |
| ubuntu mysql 8.0 설치관련 (0) | 2022.08.31 |
| code-server ssl 적용하기 (0) | 2022.08.30 |
| code-server "error listen EADDRINUSE: address already in use 127.0.0.1:8080" log (0) | 2022.08.04 |